Showing posts with label MICROSOFT OFFICE. Show all posts

4 July 2019

Detect and Translate Content in Google Sheets

Detect and Translate Content in Google Sheets,I have a Spreadsheet with content in a foreign language. How can I read that? It’s possible. You can detect and translate content in Google Sheets using its built-in functions.

Open your Spreadsheet in Google Sheets and there use the functions DETECTLANGUAGE and GOOGLETRANSLATE in a combined form.

These are two individual Google Sheet functions to help you translate content within Spreadsheet.

Then why are you using or suggest us to use these functions in a combined form?

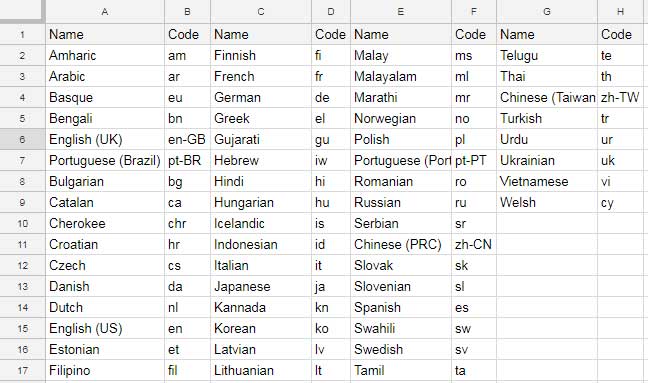
The answer is simple. Most of the time it may be difficult for you to find the foreign language that you want to translate. Even if you could find the language you must know the language code.

The DETECTLANGUAGE function finds the language codes for you and that works within the GOOGLETRANSLATE function.

I don’t have posted any individual tutorials for the above two functions. Because it’s already floating on the web. But for the example purpose, I am detailing it below.


How to use the DETECTLANGUAGE Function in Google Sheets

Syntax:

DETECTLANGUAGE(text_or_range)

Examples of Google Sheets DETECTLANGUAGE Function:

In the above examples, I have typed the below formula in B2 then dragged to down.

=DETECTLANGUAGE(A1)

I have heard that I can use the above formula in a range. Is that true?

Of course. You can use the formula as below. But it won’t return an array result.

=DETECTLANGUAGE(A1:A5)

If the range specified, that also one dimensional, contains multiple languages, the first text string found will be evaluated.


Follow the above tips to detect and translate content in Google Sheets.

24 June 2019

Cara Cepat Membuat Sel Berwarna Pelangi pada Google Spreadsheet.

Cara Cepat membuat Sel Berwarna Pelangi pada Google Spreadsheet, bagi anda yang menggunakan google spreadsheet saya akan membagikan cara cepat dan otomatis tampilan sel berwarna pelangi.
Cara Cepat Membuat Sel Berwarna Pelangi pada Google Spreadsheet.

Cara Cepat Membuat Sel Berwarna Pelangi pada Google Spreadsheet, saya rasa sangat efektif bagi kita kita karena lebih praktis dan cepat. Karena google spreadsheet bersifat online maka dalam pengerjaannya menggunakan jaringan internet. 

Lalu bagaimana langkah-langkah yang harus dilakukan untuk membuat sel berwarna pelangi pada google spreadsheet?. Perhatikan dengan seksama penjelasan saya di bawah ini:

Silahkan buka PC/ laptop anda.
1. Silahkan sambungkan PC/Laptop anda dengan koneksi internet
2. Buka browser anda.
3. Silahkan login ke akun google anda.
4. Buka fiture google spreadsheet anda
5. Klik tanda tambah seperti gambar di bawah ini
Cara Cepat Membuat Sel Berwarna Pelangi pada Google Spreadsheet.
Cara Cepat Membuat Sel Berwarna Pelangi pada Google Spreadsheet. 1

6. Silahkan anda masukkan huruf "p" pada sel A1.
7. Tekan tombol tab pada keyboard anda ke sel B1 kemudian masukkan huruf "i"
8. Tekan tombol tab pada keyboard anda ke sel C1 kemudian masukkan huruf "r"
9. Tekan tombol tab pada keyboard anda ke sel D1 kemudian masukkan huruf "d"
10. Tekan tombol tab pada keyboard anda ke sel B1 kemudian masukkan huruf "e"i
11. Jika digabungkan kelima huruf tadi akan terbentuk kata "pride" perhatikan gambar di bawah ini.
Cara Cepat Membuat Sel Berwarna Pelangi pada Google Spreadsheet.
Cara Cepat Membuat Sel Berwarna Pelangi pada Google Spreadsheet. 2

12. Selanjutnya silahkan anda tekan tombol enter/tab/klik mouse pada keyboard anda.
13. Maka secara otomatis seluruh sel pada tampilan akan berwarna seperti pelangi. 
14. Selamat mencoba dan semoga berhasil, jika langkah anda berhasil akan muncul seperti terlihat pada gambar di bawah ini.
Cara Cepat Membuat Sel Berwarna Pelangi pada Google Spreadsheet.
Cara Cepat Membuat Sel Berwarna Pelangi pada Google Spreadsheet. 3

Cara Cepat membuat Sel Berwarna Pelangi pada Google Spreadsheet, memberikan manfaat bagi anda antara lain:
1. Mempersingkat waktu.
2. Sistem akan berjalan secaraotomatis.
3. Tampilan lembar kerja anda pada spreadsheet akan terlihat lebih indah dan tentunya menjadi sedap dipandang oleh mata.

Semoga artikel saya yang mengulas tentang cara cepat membuat sel berwarna pelangi pada google spreadsheet, ini memberikan manfaat bagi kita semua. Jika memang artikel ini bermanfaan bagi anda, maka anda diperbolehnya membagikan melalui sosial media yang anda miliki, jangan lupa berikan komentar yang bersifat membangun. Sampai jumpa dengan artikel saya selanjutnya. Salam Pendidikan.

23 June 2019

Cara Membuat Watermark di Excel

Microsoft Excel tidak memiliki fitur watermark seperti di Microsoft Word. Namun, ada 2 cara yang bisa digunakan untuk membuat tampilan yang menyerupai watermark di lembar kerja Excel, yaitu:
  1. Menggunakan WordArt
  2. Menyisipkan Gambar di Header atau Footer Lembar Kerja sebagai Watermark
Berikut 2 cara untuk menyisipkan watermark di lembar kerja Excel 2007 dan 2010.

Cara 1: Menggunakan WordArt untuk Membuat Watermark

Langkah-langkah:
  1. Buka lembar kerja Microsoft Excel yang akan disisipkan watermark.
  2. Pada Insert tab, Text grup, klik WordArt.
    Insert Tab Text Group Microsoft Excel
  3. Pilih gaya WordArt yang diinginkan. Contoh: Fill – Text 2, Outline – Background 2.
    Catatan: warna WordArt mengikuti Theme yang digunakan. Tutorial ini menggunakan theme Office.
    WordArt Style Fill-Text2 - Excel2010
  4. Kemudian ketik teks yang ingin digunakan sebagai watermark. Contoh: Confidential.
    WordArt Excel 2010
  5. Selanjutnya buat pengaturan berikut:
    1. Ubah ukuran font WordArt: klik kanan pada WordArt, pada menu shortcut, ubah ukuran font pada kotaknya. Contoh: 66.
      WordArt Shortcut Menu Excel 2010
    2. Atur posisi WordArt: klik dan geser WordArt ke posisi yang diinginkan. Untuk merotasi WordArt, klik pada bulatan hijau di WordArt, kemudian rotasi ke posisi yang diinginkan.
      WordArt Rotate Excel 2010
  6. Agar data pada lembar kerja bisa terlihat jelas, atur transparansi WordArt. Caranya: klik kanan pada WordArt dan pilih Format Text Effects. Buat pengaturan pada bagian Text Fill, Text Outline, atau Shadow, sesuai dengan gaya WordArt yang digunakan.
    Untuk tutorial ini menggunakan pengaturan sebagai berikut:
    1. Klik kanan pada WordArt, dan pilih Format Text Effects. Di bagian Text Fill, pilih No fill. Perhatikan format WordArt pada lembar kerja akan ikut berubah sesuai dengan pengaturan yang dibuat.
      Format Text Effects Text Fill WordArt
    2. Pada Text Outline, klik Solid line dan di bagian Color, pilih warna untuk outlineWordArt. Contoh: White, Background 1, Darker 25%. Atur persentase Tranparency menjadi 45%.
      Format Text Effects Text Outline WordArt
  7. Hasilnya adalah seperti gambar berikut ini.
    Tampilan watermark WordArt di lembar kerja Excel.
    Watermark WordArt di Lembar Kerja Excel 2010

    Tampilan watermark WordArt di Print Preview.
    Print Preview Watermark WordArt Excel 2010
 
Catatan:

  • Untuk menghapus WordArt: klik WordArt dan tekan tombol DELETE.
  • WordArt tidak bisa digunakan langsung pada header atau footer Microsoft Excel untuk ditampilkan sebagai gambar background. Namun, kita bisa menggunakan Microsoft PowerPoint 2007/2010 untuk membuat dan menyimpan WordArt sebagai gambar dalam format jpg, gif, dan lain-lain. Baru kemudian menyisipkannya di header/footer Microsoft Excel. Contoh gambar WordArt yang dibuat di Microsoft PowerPoint bisa dilihat pada tutorial berikut ini.
Cara 2: Menyisipkan Gambar di Header atau Footer Lembar Kerja sebagai Watermark
Catatan: Pada tutorial ini kita akan menyisipkan gambar di Header.
Langkah-langkah:

  1. Buka lembar kerja Microsoft Excel yang akan disisipkan watermark.
  2. Pada Insert tab, Text grup, klik Header & Footer.
    Insert Tab Text Group Microsoft Excel
  3. Tampilan layar akan berubah ke Page Layout View dan posisi pointer akan berada di kotak tengah Header.
    Page Layout View Excel 2010
  4. Kemudian pada Header & Footer Tools, Design tab, Header & Footer elementsgrup, klik Picture untuk menyisipkan gambar.
    Sisipkan Gambar di Header Excel 2010
  5. Tempatkan kursor sebelum &[Picture], dan klik Enter beberapa kali agar posisi gambar turun ke tengah halaman (lihat gambar di atas).
  6. Kemudian klik sel di bagian luar Header untuk melihat tampilan gambar di lembar kerja.
    Watermark Gambar di Header Lembar Kerja Excel 2010 - Page Layout View
  7. Untuk mengubah ukuran gambar: klik Format Picture pada Header & Footer elements grup. Pada kotak dialog Format Picture, di Size tab, ubah nilai Scale. Misalnya, Height menjadi 125%.
    Format Picture Size Excel 2010
  8. Tampilan watermark di Print Preview adalah seperti gambar berikut ini.
    Print Preview Watermark Gambar di Header Excel 2010
  9. Untuk mengganti gambar:
    1. Pada Page Layout View, klik kotak yang berisi gambar (&[Picture]) pada Header.
    2. Kemudian pada Header & Footer elements grup, klik Picture. Pilih Replaceuntuk mengganti gambar dan sisipkan gambar yang baru.
  10. Untuk menghapus gambar, klik kotak yang berisi &[Picture] pada Header dan tekan tombol DELETE.
  11. Untuk berpindah dari Page Layout view ke Normal view: klik pada salah satu sel dan kemudian klik Normal View pada View Buttons yang terletak di kanan bawah layar (lihat gambar pada langkah 3 di atas). Atau, klik View tab, pada Workbook Views grup, klik Normal

22 June 2019

Cara cepat edit dokumen dengan fitur Find and Replace pada micosoft word

Cara cepat edit dokumen dengan fitur Find and Replace pada micosoft word, pada atikel saya kali ini akan mengulas dengan tuntas cara cepat edit dokumen dengan fitur Find and Replace pada micosoft word. Bagi anda yang bekerja pada bagian administrasi baik itu pada lembaga pemerintah maupun swasta cara  cepat edit dokumen dengan fitur Find and Replace pada micosoft word tentunya sangat bermanfaat.

Lalu apakah cara  cepat edit dokumen dengan fitur Find and Replace pada micosoft word dapat diterapkan oleh seorang guru dalam mengedit dokumen Rencana Pelaksanaan Pembelajaran (RPP). Tentunya sangat bisa bahkan sangat membantu rekan-rekan guru dalam melakukan edit RPP. Dengan menggunakan cara  cepat edit dokumen dengan fitur Find and Replace pada micosoft word ini anda dapat menghemat waktu serta menghindarkan diri dari kesalahan dalam pengeditan.

Sebagai contoh begini setelah anda mengedit Rencana Pelaksanaan Pembelajaran tentunya anda akan melakukan cetak dokumen hasil pekerjaan kita. Ternyata hasilnya masih ada yang belum teredit dengan sempurna. Bisa dibilang ada beberapa kata yang terlewatkan. Misalnya anda akan mengedit Tahun Pelajaran 2018/2019 menjadi Tahun pelajaran 2019/2020 jika anda menggunakan cara manual kemungkinan terjadi kesalahan dalam pengeditan. Repot bukan? sudah kita cetak ternyata masih ada yang salah. Berapa kerugian yang kita peroleh dengan keadaan ini, misalnya yang mudah saja anda rugi waktu, kertas bahkan tinta printer anda.

Namun anda tidak usah kuatir saya akan memberikan cara  cepat edit dokumen dengan fitur Find and Replace pada micosoft word agar semua kejadian yang saya ceritakan di atas tidak terjadi pada anda. Berikut ini adalah langkah-langkah yang perlu anda lakukan untuk mengedit dokumen dengancara  cepat edit dokumen dengan fitur Find and Replace pada micosoft word :

1. Silahkan anda buka buka dokumen yang akan anda edit.
2. Silahkan anda block kata yang akan anda edit misalkan 2018/2019.
3. Kemudian anda tekan tombol CTRL + F.
4. Lalu akan muncul seperti gambar di bawah ini.


5. Akan muncul Tahun Pelajaran 2018/2019 berwarna biru pada pojok sebelah kiri dibawah Navigasi. 

6. Selanjutnya silahkan anda arahkan kursor anda ke " Tahun Pelajaran 2018/2019 " klik panah ke bawah pada nagivasi tersebut perhatikan pada gambar di bawah ini.

7. Klik Replace lalu akan muncul kotak dialog find dan Replace.
8. Perhatikan pada kolom replace with silahkan diisi dengan kata " Tahun Pelajaran 2019/2020.
9. Kemudian anda klik Replace All
10. Muncul kotak dialog baru microsoft Word baru yang berisi " word has finished searching selection. 1 replacement. Do you want to search the remainder of the document?" pilih "Yes" . Perhatihan gambar di bawah ini.

11. Muncul kotak dialog baru microsoft Word baru yang berisi " Word has reached the end of the documen. 28 replacements were made. Do you want to continue searching at the beginning?" kemudian klik yes. Seperti pada gambar di bawah ini.


12. Muncul kotak dialog baru microsoft Word baru yang berisi " word has completed its search of the dokumen anda has made 29 replacements." Klik Ok seperti pada gambar di bawah ini.


13. Hasilnya semua kata "Tahun Pelajaran 2018/2019" berubah secara otomatis menjadi " Tahun Pelajaran 2019/2020, seperti terlihat pada gambar di bawah ini.

Hasil Akhir
Hasil Akhir

Mudah bukan, lakukan langkah-langkah yang sama untuk melakukan pengeditan yang lainnya mulai dari langkah nomor 1 sampai dengan nomor 13, saya rasa cara  cepat edit dokumen dengan fitur Find and Replace pada micosoft word  ini akan efektif digunakan bagi anda yang berkeinginan mengedit dokumen tahun lalu, bulan lalu dengan menggunakan cara ini. Juga ada penghematan waktu dan pekerjaan menjadi lebih rapi serta mengurangi kesalahan dalam proses pengeditan.

Bekerja dijaman serba digital tentunya diperlukan cara berkerja yang kekinian dengan memanfaatkan beberapa fitur pada microsoft word yakni Find dan replace. Tentunya atasan anda juga menjadi senang karena pekerjaan anda cepat selesai dan tanpa adanya salah pengeditan. Dan anda juga bisa dapat penghargaan dari atasan anda.  Menyenangkan buka cara  cepat edit dokumen dengan fitur Find and Replace pada micosoft word.

Semoga artikel cara  cepat edit dokumen dengan fitur Find and Replace pada micosoft word  bisa membantu anda dalam tugas adminstrasi anda. Berikan komentar yang bersifat membangun atau anda juga dapat membagikan artikel cara  cepat edit dokumen dengan fitur Find and Replace pada micosoft word  ke media sosial yang anda miliki. Sampai jumpa dengan artikel saya selanjutnya.

13 June 2019

What version of Outlook do I have?

What version of Outlook do I have?

With so many Outlook apps and services, it can be confusing to know which version you're using. To find out, choose how you access Outlook:

Outlook is a powerful application for managing your email, contacts, and calendar. Follow these steps to find out which version of Outlook is installed on your computer.
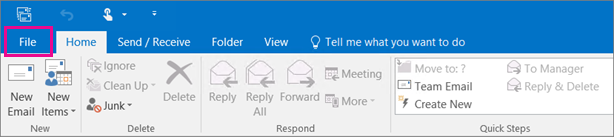
  1. In Outlook, choose File.
    This is what the ribbon looks like in Outlook 2016.
  2. Select Office Account.
    If you don't see Office Account, option, choose Help. You'll see the product version on the right side of the page.
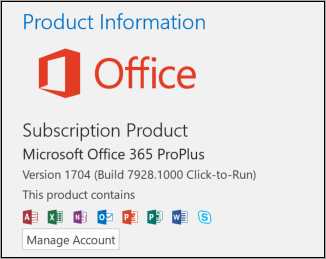
  3. You'll find your version and build number under Product Information. For example, the following displays for Microsoft Office 365 ProPlus, which includes Outlook.
    Version and build number under Product Information
  4. If you need to know whether you're using the 32-bit version or the 64-bit version of Outlook, select About Outlook.
    Choose the About Outlook box.
  5. The top of the About Outlook box shows the version number and 32-bit or 64-bit distinction.
    At the top of the box it says 32 or 64 bit.


Am I running Outlook for Office 365 Monthly Channel or an Insider build?

Some Outlook features are only available as part of Outlook for Office 365 or the Office Insider program.
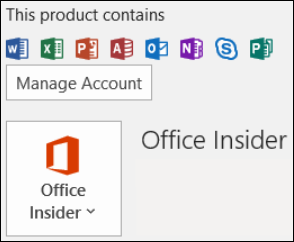
Select File > Office Account. If you see Office 365 or Office Insider, you're running Outlook for Office 365 Monthly Channel or an Insider build.See File > Office Account to find your Outlook version.

My Outlook doesn't look like this, but I'm using a Windows 10 PC

If you’re using Windows 10, and your Outlook doesn’t match the images here, there are two possible reasons.
  1. You’re using an older, unsupported version of Outlook, such as Outlook 2003. You can often find the Outlook product version by selecting Help > About.
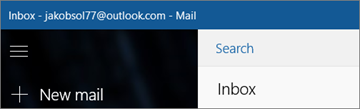
  2. You’re using Windows 10 Mail. Windows 10 Mail is a free program included with all Windows 10 computers. If you’re using Windows 10 Mail, your Inbox will look something like this.
What the ribbon looks like when you have the Mail app for Windows 10.
To learn more about Windows 10 Mail, see Windows 10 Mail and Calendar FAQ.

8 June 2019

Files restore for SharePoint and Microsoft Teams

Files restore for SharePoint and Microsoft Teams,Data loss is non-negotiable. Period. As innovation in the cloud drives business value, it delivers new capabilities to the IT professionals and site admins who work tirelessly to support, configure, administer, and secure their organizations’ and teams’ content. And it is important that you are empowered to recover from accidental deletions or version issues at the speed business productivity requires.

Today we begin to roll out Files Restore for SharePoint and Microsoft Teams – a new Microsoft 365 feature. This is associated with Microsoft 365 Roadmap: ID 33714 and originally announced at Ignite 2018.

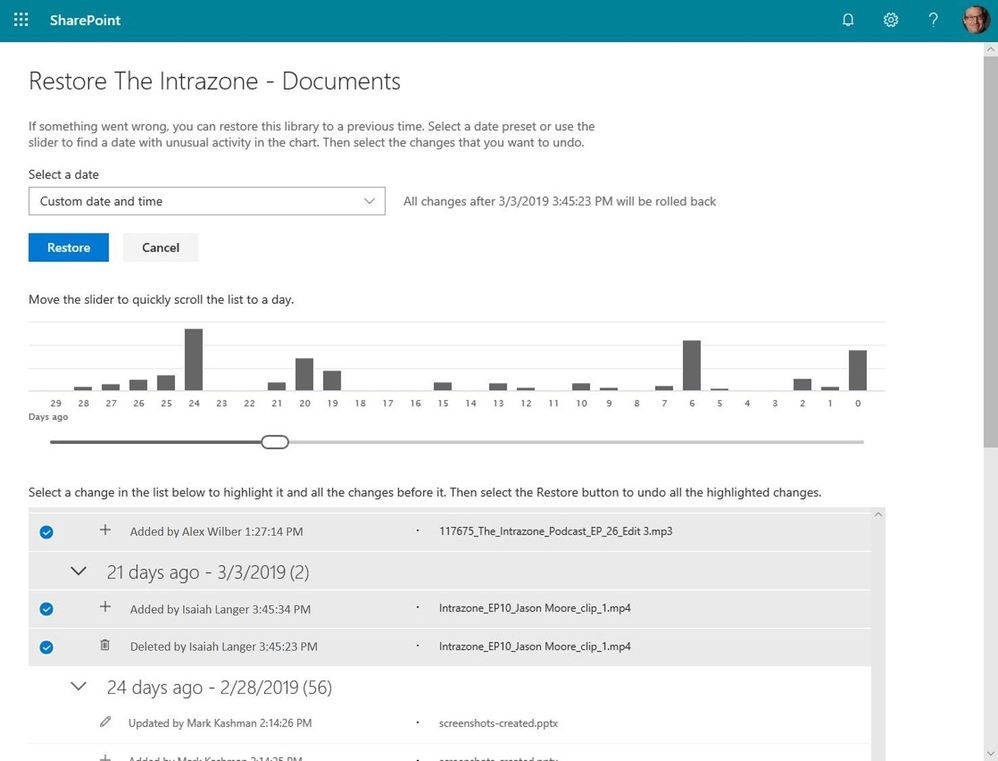
SP_Files-Restore_001_main-user-interface.jpgIf something went wrong, you can restore a SharePoint document library (the same storage mechanism behind the Files tab in Microsoft Teams) to a previous time. Select a date preset or use the slider to find a date within unusual activity in the chart. Then select the changes that you want to undo.
We've built Microsoft 365 with global scale, exceptional reliability, and support for compliance across industries and geographies on top of intelligent security that keeps your service and content protected and private, we give you granular and dynamic controls so that you can manage access, distribution and recovery of your organization's sensitive content and information.

Let’s dive into the details…

Restore your files with confidence from SharePoint and Microsoft Teams

Files restore for SharePoint and Microsoft Teams is a complete self-service recovery solution that allows administrators and site owners to restore files from any point in time during the last 30 days. Site owners will see a new "Restore this library" option within the library settings panel. This can be used as a self-service to restore the files and folders in the library you suspect have been compromised by end-user deletion, file corruption, or malware infection – to any point in the past 30 days.

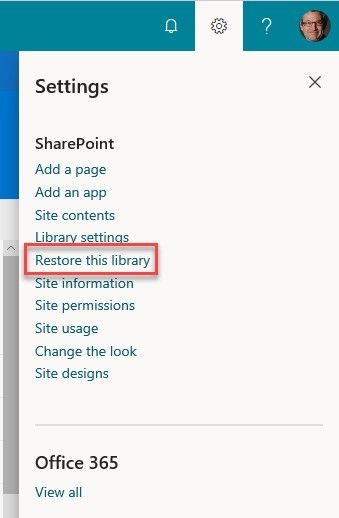
Simply go to the gear icon in the upper right > select Restore this library > select a date range, select your files > click Restore.

SP_Files-Restore_002_main-UI.jpgGo to Site Settings and select "Restore this library" to start the process of recovering a file or set of files based on a date prior to the issue.
If lots of your SharePoint or Teams files get deleted, overwritten, corrupted, or infected by malware, you can restore your entire document library to a previous time. Files Restore helps Office 365 subscribers undo all the actions that occurred on both files and folders within the last 30 days.

Files Restore is now available for SharePoint document libraries, protecting your shared files in SharePoint, Teams, Outlook groups, and Yammer groups connected to Office 365 groups and uses the same recovery capabilities that protect your individual files in OneDrive for Business.

Note to IT: files across the SharePoint and Teams user interfaces are stored in the same storage container (SharePoint document libraries), thus offer the same experience and capabilities as a single-source offering throughout Microsoft 365.

What else do I need to know?

Now you can rewind changes using activity data to find the exact moment to revert to.

We'll be gradually rolling this out to Targeted Release organizations in April 2019, and the roll out will be completed worldwide by the end of May 2019.

Learn more how to restore your SharePoint and Teams files. And the related how to restore your OneDrive.

Frequently Asked Questions (FAQs)

Q: When is this all being released in Office 365?
A: Files restore for SharePoint has begun Targeted Release to customers in Office 365. We plan to extend release to all full Targeted Release customers by the end of April 2019. We then plan to fully release to all full production Office 365 customers by the end of May 2019.

31 May 2019

Membuat dan berbagi diagram Visio berbasis data langsung di Excel Pada Office 365

 Membuat dan berbagi diagram Visio berbasis data langsung di Excel Pada Office 365, 

Yang Anda perlukan untuk memulai adalah berlangganan Office 365 tidak perlu berlangganan Visio. Untuk membantu Anda memulai, add-in dilengkapi dengan tabel data sampel yang dapat Anda modifikasi dan kemudian lihat divisualisasikan ke dalam diagram yang terlihat profesional. Saat ini, add-in mendukung diagram alur dasar dan diagram alur lintas fungsional (juga dikenal sebagai diagram alur swimlane), tetapi lebih banyak jenis diagram, seperti bagan organisasi, sedang dalam perjalanan.

 Membuat dan berbagi diagram Visio berbasis data langsung di Excel Pada Office 365
 Membuat dan berbagi diagram Visio berbasis data langsung di Excel Pada Office 365
Add-in Data Visualizer tersedia sekarang dalam pratinjau pribadi. Anda dapat mengisi formulir singkat untuk menerima undangan eksklusif untuk mencobanya.
Membuat bagan alur dari data di Excel: Add-in Data Visualizer dilengkapi dengan tabel data sampel yang dapat diedit di Excel. Anda bisa menambahkan langkah-langkah proses, memodifikasi konektor, membuat dependensi, memasukkan pemilik, dan banyak lagi untuk membantu Anda memulai. Setelah selesai, pilih "Refresh diagram" untuk melihat perubahan Anda disinkronkan dengan diagram yang ditautkan data tepat di Excel

Siapa pun yang berlangganan Office 365 dapat menggunakan add-in Data Visualizer untuk secara otomatis membuat diagram Visio; memanipulasi data Excel yang mendasarinya untuk memodifikasi diagram; dan, melihat, mencetak, dan berbagi diagram. Untuk pengeditan diagram yang lebih terperinci dalam Visio atau Visio Online, Anda akan memerlukan langganan Visio Online Plan 1 atau Visio Online Plan 2.Lihat, cetak, dan bagikan diagram alur Anda: Diagram Visio Anda dibuat sebagai file online secara default, sehingga Anda dapat dengan mudah melihat, mencetak, dan membaginya dengan pengguna Office 365 lainnya

Baca artikel dukungan Visualizer Data kami untuk mempelajari lebih lanjut tentang mengonversi data peta proses Excel menjadi diagram Visio. Anda dapat mengakses dukungan tambahan dan mengirimkan umpan balik Anda langsung dari add-in dengan mengklik elips dan memilih "Bantuan" atau "Kirim umpan balik

18 May 2019

Create SharePoint lists from Excel or other lists

Create SharePoint lists from Excel or other lists

Changing the way business gets done – digital transformation – begins with great data. Microsoft 365 offers powerful tools for building workflows, automation and reporting – PowerApps, Flow, and Power BI. But you need a great place to store all that data.
Every month, millions of users turn to SharePoint lists to store critical business data.  Lists are secure, easy to use, and high capacity, with up to 30 million items in a single list.  Today, across Microsoft 365, SharePoint lists store billions of rows of data to house information for scenarios like customers, audits or emergency room availability and more across Microsoft 365.
Now, we’re making it easier than ever to get started with a list – using Excel or other lists as a starting point.

Create a SharePoint list from an existing list or from Excel

For years, business data often began life in Excel.  Excel is widely used and a common download format.  But lists are shareable, secure, mobile friendly, easy to use and easy to customize. 

As we previewed at SPC18, we’re releasing new abilities to let you create new lists from an existing list, or from an Excel table.  You can start from the Site Contents page.

Lists from lists

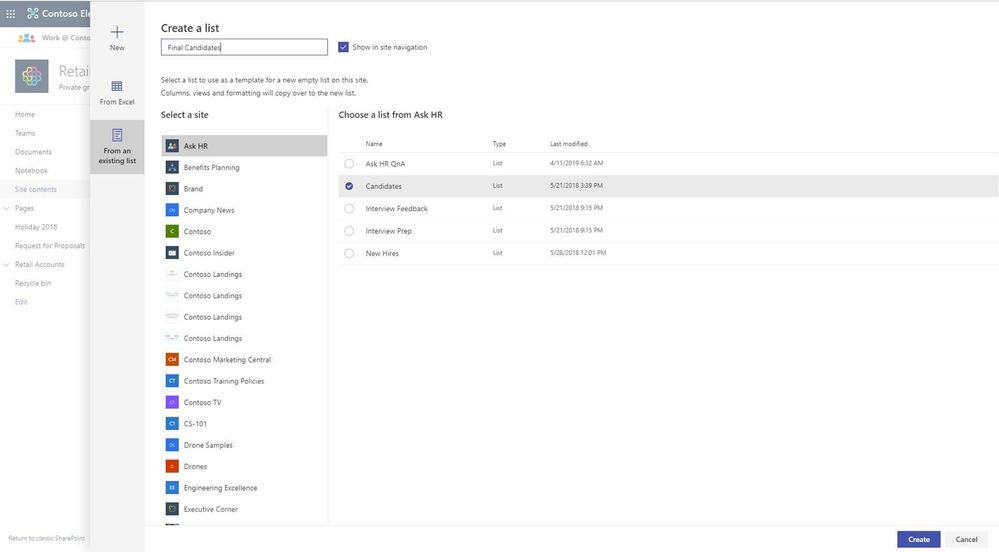
You can create a list from all existing lists within any site where you’re an editor.  When the new list is created, the entire list structure is copied, including forms, formatting, and custom metadata columns.   (Content will not be copied.)
L2.jpgCreating a list from other lists
Figure 1 - Creating a list from other lists

Lists from Excel

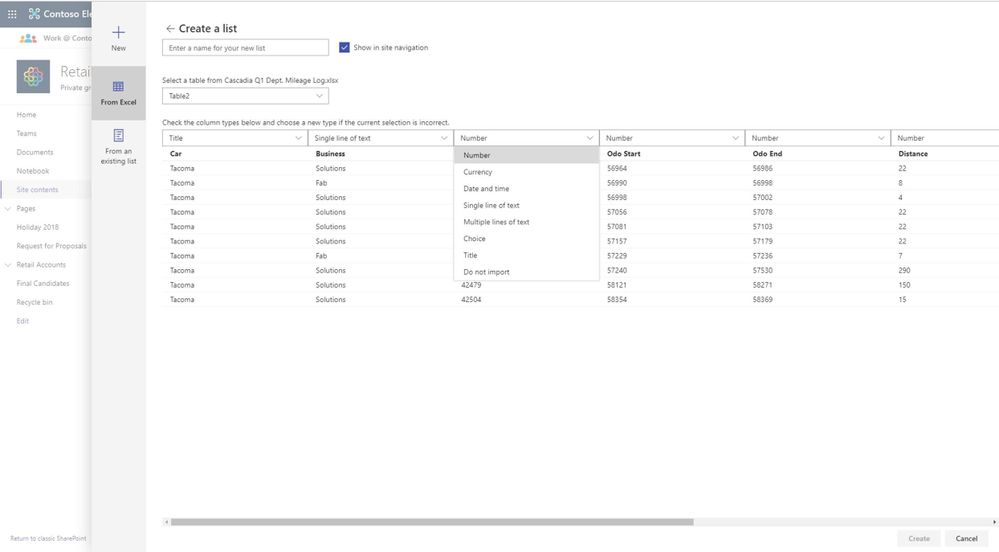
To create a list from Excel, you can select a table from your most recent Excel files in SharePoint or OneDrive.  You can change the field type of the column if needed, and all your table data will be copied to the new lists.

L6.jpgMapping Excel data to the new list

Next steps

Want to try this out now?  Head over to the Business Apps Resource Center for a demo.

We’ll start rolling out the new list creation experience to Targeted Release in mid May 2019.   You can share your feedback with us here on the TechCommunity, on UserVoice or at the SharePoint Conference.  As always, if you need more details you can find it on our Microsoft 365 Business Apps Resource Center.  Thanks.